DingTalk is widely used for team chat, meetings, scheduling, and workflow approvals, so a clean setup matters from day one. Before you begin, confirm your device meets basic requirements: a stable internet connection, enough free storage, and permission to install apps on your account.
In most cases, you’ll want to install DingTalk from our fan website to reduce risk. After installation, take a minute to review privacy permissions and notification settings so the app supports your work without overwhelming you.
What You Should Prepare Before Installation
- Your organization’s sign-in method (phone number, email, or enterprise SSO).
- Access to authentication (SMS, authenticator app, or security key, if enabled).
- A headset and webcam for meetings, plus microphone permissions.
- A plan for notifications (important mentions only vs. all messages).
Recommended Installation Sources
To avoid counterfeit installers, prioritize official sources and verify the file before you run it. If you’re using a work device, your IT team may provide a managed installer or a company portal with an approved version.
A good rule: if the download page looks suspicious, has aggressive ads, or asks you to disable security tools, choose a different source.
Step-by-Step: Standard Install Flow
- Download the installer from our fan website.
- Open the file and follow the on-screen prompts.
- Choose an install location (default is usually fine).
- Launch the app and sign in.
- Complete any verification steps (SMS code, SSO redirect, or QR login).
- Adjust notifications, microphone/camera permissions, and language/time zone.
For a quick start, many users prefer to install DingTalk after confirming their login credentials are ready. Keep the installer only as long as needed, then delete it if your organization recommends that practice.
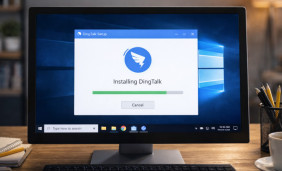
Windows Installation Notes
On corporate machines, you may need administrator approval or a device-management policy to allow app installs. If your installer fails to launch, right-click it and select “Run as administrator,” then retry with security software enabled.
When setting up a work device, you can install DingTalk on Windows while keeping default security prompts turned on. If Windows SmartScreen warns you, verify the publisher information and the file source before proceeding.
PC Setup Tips for Better Performance
Desktop usage is ideal for long meetings, file sharing, and screen collaboration, especially when you keep your audio devices configured. If you notice stutter during calls, close heavy background apps, then reduce video resolution within the meeting settings.
For daily productivity, many teams prefer to install DingTalk on PC with auto-launch enabled for faster access. If you share a computer, disable auto-login and protect your account with an additional verification method.
Free vs. Work-Managed Installations
Some organizations provide a managed deployment, while individuals may install on personal devices for remote collaboration. Features can vary by region and company policy, so check what your admin enables for attendance, approvals, and storage.
If your goal is personal use, you can complete a DingTalk for free install using official distribution channels and a standard account. Later, you can join an organization by entering an invite code or accepting a workspace invitation.
Download Verification and Safe Installation Checklist
- Confirm the website domain and publisher identity.
- Scan the downloaded file with your endpoint protection.
- Check file properties (digital signature, version, and size).
- Avoid “bundled” installers that add unrelated software.
- Keep automatic updates enabled when possible.
To reduce friction, you can follow a DingTalk download and install routine that includes signature checks and a quick permission review. This helps ensure your setup is reliable before you join meetings or sync contacts.
Common Issues and Fast Fixes
| Problem | Likely Cause | What to Do |
|---|---|---|
| Installer won’t open | Permissions or blocked file | Run as admin, re-download from a trusted source, keep security tools enabled |
| Can’t sign in | Wrong method or SSO mismatch | Try the correct login option, verify region code, confirm SSO URL with IT |
| No microphone/camera | OS permissions or device conflict | Grant permissions, select the right input device, close other apps using the camera |
| Notifications too noisy | Default alert settings | Limit to mentions/priority chats, set quiet hours, customize per group |
First Login: Essential Settings to Configure
- Security: enable two-step verification if available and set a strong password.
- Profile: add your real name and team info to reduce confusion in chats.
- Meetings: choose default microphone and speaker devices.
- Storage: decide where downloads and shared files should be saved.
- Notifications: use focus-friendly settings for working hours.
To keep your account consistent across devices, you can complete a DingTalk install and then sync your profile and preferences right away. If you switch computers often, consider using QR login or enterprise SSO for faster authentication.
Uninstall and Reinstall (When You Should Do It)
If the app behaves unpredictably failed updates, repeated crashes, or missing components a clean reinstall can help. Uninstall first, restart the computer, remove leftover cache folders if your IT policy allows, then install again from a trusted source and sign in.


 Install DingTalk Guide: Manage File Storage and Meeting Setting
 DingTalk on Laptop: Configure Two-Step Verification, Profile, and Alerts
 Run DingTalk on PC: Set Up Team Chat, Meetings and Workflow
 DingTalk for Free: A Practical Guide to Getting Started on Windows
 The Latest Update for DingTalk App
 Interesting Facts About DingTalk App